You can write great content and still struggle to rank if search engines cannot crawl, render or index your pages properly. Technical SEO is the foundation under everything else, and small problems there often go unnoticed for months.
A technical SEO audit finds those problems before they cost you traffic. This practical guide from Twastia.io walks through the checks that matter most for small business sites, in the order we recommend tackling them.
What a Technical SEO Audit Covers
A technical audit looks at how well search engines can access and understand your website. It is different from on-page SEO, which focuses on the content and tags of individual pages.
For most small business sites, the audit comes down to five areas: crawling, indexing, site structure, performance and structured data. Google Search Console, PageSpeed Insights and a basic site crawler cover most of it.
Step 1: Check Crawlability
Search engines discover pages by following links and reading your sitemap. If something blocks them, even your best pages can stay invisible.
Review Your Robots.txt File
Open yourdomain.com/robots.txt and read it line by line. Make sure it is not blocking important sections, such as your services, blog or product pages. Google’s introduction to robots.txt explains what each rule does.
Remember that robots.txt controls crawling, not indexing. To keep a page out of search results, use a noindex tag instead.
Submit a Clean XML Sitemap
Your XML sitemap should list only live, indexable pages that return a 200 status code. Remove redirected, broken and noindexed URLs, then submit the sitemap in Google Search Console. Google’s guide to sitemaps covers formats and limits.
Step 2: Confirm What Google Has Indexed
The Page indexing report in Search Console shows which pages are indexed and why others are not. Focus on the reasons that affect pages you actually care about.
- Excluded by noindex tag: check that the tag was intentional.
- Crawled, currently not indexed: often a sign of thin or duplicate content.
- Duplicate without user-selected canonical: add canonical tags that point to the preferred version.
- Not found (404): redirect or fix links to pages that no longer exist.
Use the URL Inspection tool to test individual pages. It shows whether Google can fetch the page and which canonical it selected.
Step 3: Fix Site Structure and Internal Links
A logical structure helps search engines understand which pages matter most. Important pages should be reachable within a few clicks of the homepage.
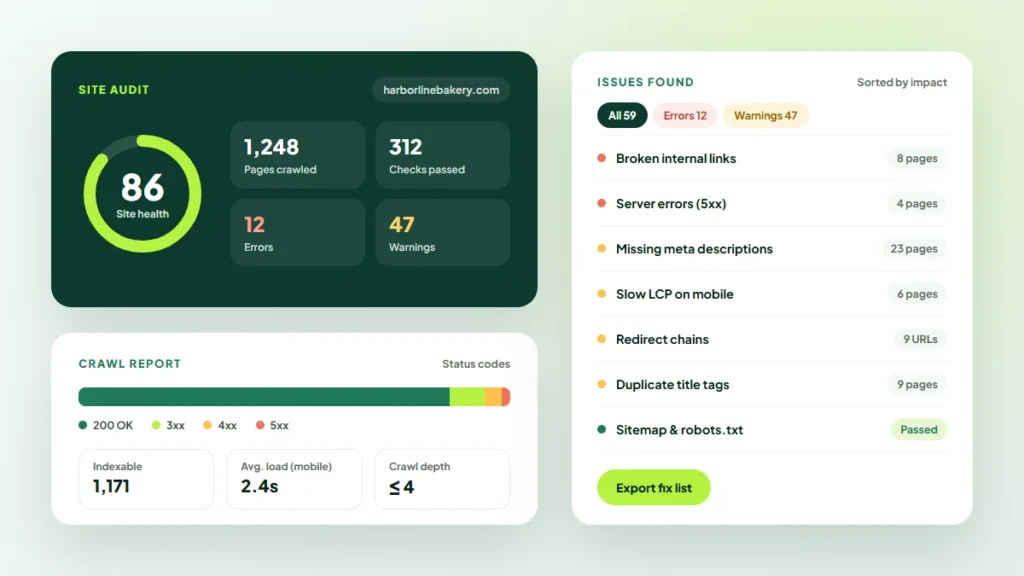
- Run a crawl and look for orphan pages with no internal links pointing to them.
- Fix broken internal links and update links that pass through redirects.
- Shorten redirect chains so each old URL points straight to its final destination.
- Check that URLs are short, lowercase and descriptive.
Internal linking overlaps with page-level work, so pair this step with our on-page SEO checklist for titles, headings and content fixes.
Step 4: Test Speed and Core Web Vitals
Core Web Vitals measure loading, responsiveness and visual stability. Check the Core Web Vitals report in Search Console for groups of slow URLs, then test examples in PageSpeed Insights.
Common fixes include compressing images, removing unused plugins and scripts, enabling caching and choosing reliable hosting. Speed matters most on the pages that turn visitors into leads, which is why it features in our landing page design best practices.
Step 5: Check the Mobile Experience
Google primarily uses the mobile version of a site for indexing. Load your key pages on a real phone and confirm that text is readable, buttons are easy to tap and content matches the desktop version.
Hidden content, intrusive pop-ups and layouts that spill off the screen all frustrate visitors. They are also easy to miss if you only review your site on a desktop.
Step 6: Secure and Consolidate Your Domain
Your site should load on one version only, using HTTPS. Test the variations with and without “www” and with “http” to make sure each one redirects to the same secure address.
Check for mixed content warnings, where an HTTPS page loads images or scripts over HTTP. Browsers may block those files, and visitors may see security warnings.
Step 7: Validate Structured Data
Structured data helps search engines understand details such as your business type, services, articles and FAQs. Test your markup with Google’s Rich Results Test and fix any errors it reports.
Only mark up content that visitors can actually see on the page. Markup that does not match the visible content may be ignored.
How to Prioritize What You Find
A first audit often turns up a long list of issues. Not all of them deserve equal attention.
- Fix first: anything blocking important pages from being crawled or indexed.
- Fix next: broken links, redirect chains and duplicate content on key pages.
- Then improve: speed, mobile usability and structured data.
- Monitor: minor warnings that do not affect pages that bring in business.
Key Takeaways
- Start with crawlability and indexing, because nothing else matters if pages are invisible.
- Keep your sitemap clean and your robots.txt rules intentional.
- Fix broken links and redirect chains to keep your structure tidy.
- Improve speed and mobile experience on pages that generate leads.
- Repeat the audit regularly and after any major site change.
For more on rankings, content and search performance, browse our SEO articles.
Get Expert Help With Technical SEO
Technical issues are easy to miss and hard to diagnose without experience. If you would like specialists to handle them, explore the search engine optimization services from Twastia.io.
Not sure whether technical problems are holding your site back? Request a free growth audit, and Twastia.io will check how search engines crawl and index your site, then share a prioritized list of fixes.